Free
How to Add Special Effects in your Video
Doodly is not just about drawing graphics and text on a whiteboard. Did you know that you can also create awesome special effects within the software? In today’s blog, we will give you a step-by-step walkthrough on how to add these effects to your videos. They are simple, but they add a lot of fun to your presentation. So let’s get started with our first effect: the Erase effect!
ERASE EFFECT
The Erase effect is a great way to enhance your whiteboard animation videos. It’s a built-in feature in Doodly that not everyone utilizes. Today, we will show you how to use this effect to make your presentation more exciting.
Let’s break down the process into scenes. Starting with step 1:
FIRST SCENE SETTINGS

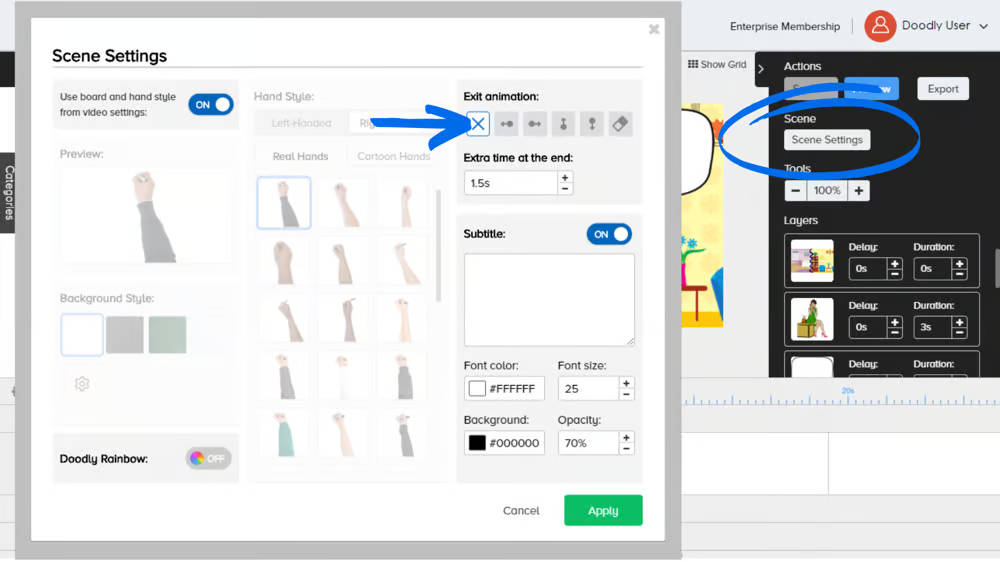
STEP 1: Set the Exit Animation of your first scene to NONE.
To ensure a seamless transition between scenes, set the Exit animation to “X” or None for your first scene. This will eliminate any gaps or transition effects. (Fig. 1)
Step 2: Add extra time at the end.
If you want your viewers to have more time to read your text, you can add extra time at the end of each scene. By default, this extra time is set to 0.5 seconds, but for our video, we set it to 1.5 seconds. Remember, you can customize this setting for each scene based on the length of your text. The more text you have, the more extra time you need. (Fig. 2)
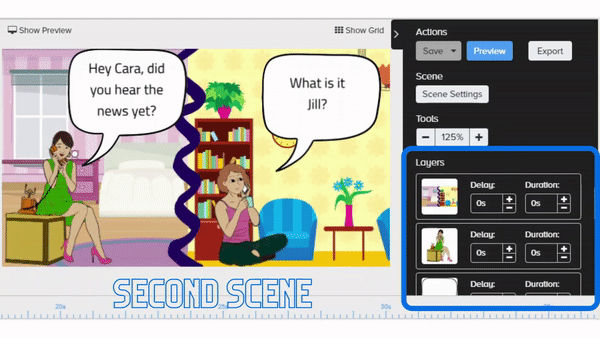
STEP 3: Update Layers settings.
By default, all assets have an animation duration of 3 seconds. For our sample scene, we changed the animation duration of the background image to zero so it won’t be drawn by hand. The rest of the assets have a duration of 3 seconds. The Delay value for all assets is set to zero. (Fig. 3)
STEP 4: Duplicate the first scene.
From the timeline, right-click on the first scene and choose “Duplicate” to create the second scene. (Fig. 4)
SECOND SCENE SETTINGS

STEP 5: Update Layers settings.
In the second scene, update the Layers menu again. Set the animation duration of all assets to zero, just like in the first scene. Make sure the delay value is also set to zero. We don’t want the hand redrawing everything during scene transitions. (Fig. 5)
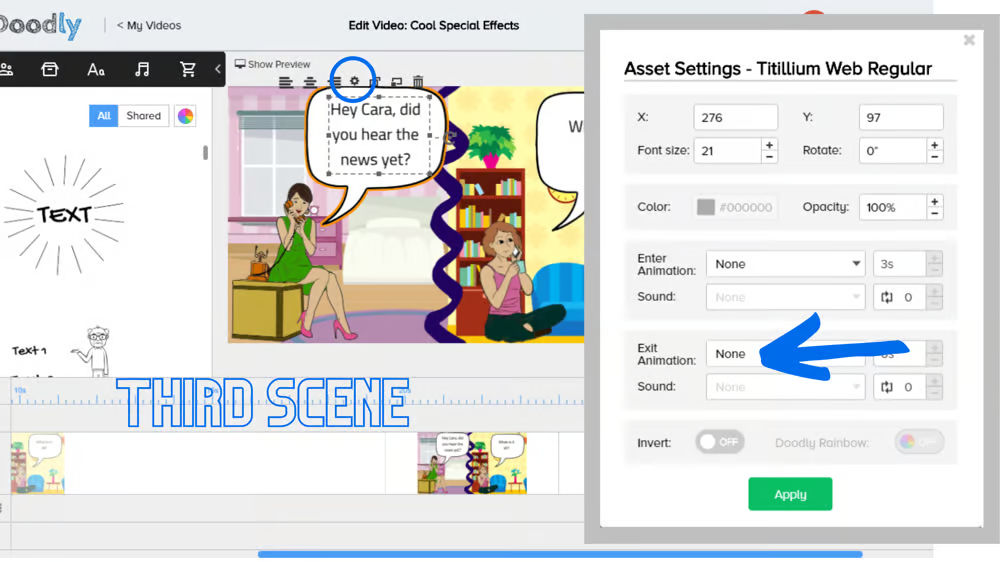
STEP 6: Set the Exit animation of your text to Erase.
Select the texts that you want to replace, click the gear icon to open the Asset Settings, and choose Erase from the Exit animation dropdown. Keep the animation duration of your text at 1.5 seconds. (Fig. 6)
STEP 7: Duplicate the second scene.
Once again, duplicate the scene by right-clicking on the second scene in the timeline and selecting “Duplicate”. This will create the third scene. (Fig. 7)
THIRD SCENE SETTINGS

STEP 8: Set the Exit animation of your text to None.
In the third scene, update the animation settings of all the texts. Change the Exit animation from Erase to None. (Fig. 8)
Step 9: Add the new texts.
Now, it’s time to add your next set of texts. Double-click on each text in the third scene and replace them with the new texts based on your script. (Fig. 9)
Congratulations! You have successfully created the Erase effect. If you have more texts in your script, simply repeat steps 6 to 9.
To summarize the Erase process:
And there you have it, an awesome video with the Erase effect!
Now, let’s move on to another example:
Check out this awesome example:
GLITCH
The Glitch effect is a simple yet fun effect to use. Although there are some limitations in the software, we’ll explain those as we walk you through the process.
FIRST SCENE SETTINGS
STEP 1:
Set the Exit animation of your first scene to NONE.
Just like in the previous effect, disable the Exit animation for the first scene.
In the same settings, you’ll find the Extra time at the end option, which is where the system limitation comes into play. To create a perfect glitch effect, we need the shortest possible time for the exit animation. Ideally, 0.3 seconds or less is best, but with Doodly, the minimum scene duration is 0.5 seconds, so we’ll stick with that timing. (Fig. 13)
Step 2:
Update the settings for your Glitch effect’s first scene. You have the flexibility to choose which assets are drawn and which are not, and you can also adjust the duration if desired. In our example, there is only one asset in the scene, and the default animation duration is set to 1.5 seconds with a delay value of zero (Fig. 14).
Step 3:
Duplicate the first scene. Once you have everything set up, go ahead and make a copy of the first scene (Fig. 15).
Second Scene Settings:
Step 4:
Update the settings for the layers in the second scene. Set both the Duration and Delay to zero in the Layers menu (Fig. 16).
Step 5:
Duplicate the second scene. Now that your second scene is ready, you can duplicate it up to 6 times or more, depending on how long you want the effect to last. At this point, you will have multiple scenes to work with (Fig. 17).
Step 6:
Edit the text.
a. Apply alternate colors to your text. You can start by applying colors from the second scene, then the fourth, sixth, and so on. If you prefer to start with the first scene, then the third, and fifth, that works too (Fig. 18).
b. Create alternate movements for each scene. You can either drag the text using your mouse or use the arrow keys (Fig. 19).
Summary of the Glitch effect process:
Now, let’s take a look at our final output:
Here’s another example:
Stop Motion.
Stop Motion utilizes the same technique as the Glitch effect, but with a twist. In this case, we allow an object to move from one location to the opposite direction of our scene. The best assets to use for the Stop Motion effect are objects that typically move in real life, such as cars, trucks, or any other vehicles. You can also use objects that can roll, like a ball, a rolling coin, or a marble. Alternatively, you can get creative and make non-moving objects swing or roll in your scene.
Step 1:
Add a background scene and disable the exit animation.
After adding your background image, disable the exit animation for your first scene by setting it to “X” or NONE (Fig. 24).
Step 2:
Add the asset you want for the Stop Motion effect.
For our example, we’ve added a red car that will move from the left side to the right side of our screen (Fig. 25).
Step 3:
Set the animation duration to zero in the Layers menu.
Make sure to set the Duration and Delay values to zero in the Layers menu.
Step 4:
Zoom out to capture the entire scene.
Zoom out until you can see the entire scene on your screen. Position the red car on the left side, showing just the tip of the hood (Fig. 27).
Step 5:
Duplicate the first scene.
Right-click on the first scene in the timeline to duplicate it (Fig. 28).
Second Scene Settings:
Step 6:
Move the car.
In the second scene, move the car half an inch forward. Once done, duplicate the second scene (Fig. 29).
Third Scene Settings:
Step 7:
Move the car again.
Move the car an inch away from its previous position, then duplicate the scene (Fig. 30).
Repeat Step 7 until the car reaches the other side of the screen.
Summary of the Stop Motion process:
And here is our final result:
[stop-motion-gifff.gif]
And that’s a wrap!
These are just three special effects you can use in your Doodly videos. Which one is your favorite? We hope they inspire you to create even more amazing presentations using the software. Until next time! 🙂


