Free
How To Avoid Common BEGINNER MISTAKES in Doodly
Just bought Doodly and can’t wait to dive in? Before you get started, let’s talk about some common beginner mistakes you should avoid.
Learning a new software can be frustrating, especially if you’re trying to figure it out on your own. That’s why it’s highly recommended to watch tutorial videos first. They’ll teach you the basics and help you make the most out of your Doodly experience.
Now, let’s take a look at the top 8 beginner mistakes in Doodly.
Mistake #1 – Using the Default Scene
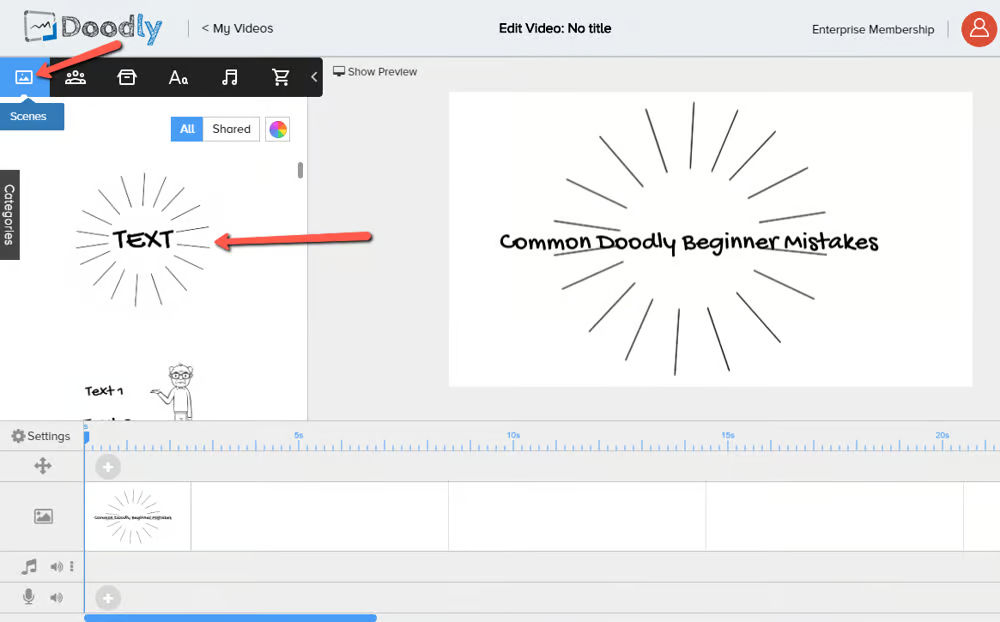
When creating your first Doodly project, it’s tempting to stick with the default scene. But if you want your presentation to stand out, it’s best to explore other scene options. And if you do decide to use the default scene, consider customizing it to make it unique.
Here are some ideas for customizing the default scene:
– Change the font to match the theme of your presentation. Avoid using inappropriate fonts for formal videos. You can choose from a variety of available fonts or import your own.
– Use word wrap to make your text look clean and presentable.
– Adjust the size and placement of your text to emphasize your message.
– Change the alignment of your text for a different look.
– Change the color of assets to bring focus to the text.
– Add characters and props to make the scene more engaging.
The possibilities are endless when it comes to customizing the default scene. Don’t be afraid to get creative and make it your own.
Mistake #2 – Captivate your audience with selective drawing
Don’t bore your viewers with drawn-out scenes. Instead, focus on the key elements you want to highlight. In our example scene, we show you how to prioritize the bus dropping off kids at school. By adjusting the drawing duration and strategically arranging assets, you can create a more engaging and efficient presentation.
Take a sneak peek at the scene now that we’ve tweaked how long it lasts!
Mistake #3 – Smooth transitions and seamless narration
Make sure your video flows smoothly and allows for proper narration. Avoid abrupt scene changes that can make your video feel rushed. With a simple setting adjustment, you can add extra time at the end of each scene, allowing for a seamless transition and optimal timing for voiceover.
Guess what? We just made a cool enhancement to the first scene. We added an extra 3 seconds at the end and it looks awesome!
Mistake #4 – Unlock the power of stock images and custom uploads
While Doodly provides a variety of great assets, don’t limit yourself! Take advantage of the ability to upload and use your own images. Whether it’s Mickey Mouse or any other character, easily customize your scenes to fit your unique needs and preferences.
Mistake #5 – Polished presentations with personalized draw paths
Make your images look more professional and captivating by creating your own draw paths. With a few simple steps, you can adjust the draw paths, ensuring a clean and precise appearance. Capture your viewer’s attention with detailed and well-drawn images.
Take a look at this side-by-side comparison of an image with a modified draw path and an unmodified one.
Mistake #6 – Say goodbye to color changes
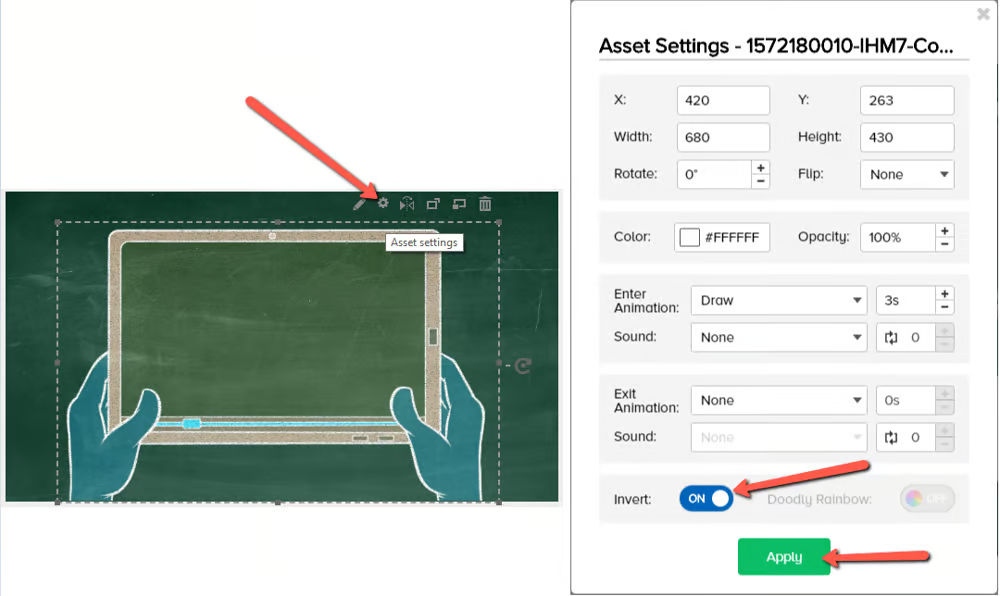
In the past, some imported images experienced color changes due to adjustments made for chalkboard visibility. However, this issue has been resolved with our latest update. Should you encounter any color discrepancies, simply toggle the “Invert” color option on or off to restore the original colors.
With these valuable tips, you’ll create presentations that captivate, engage, and leave a lasting impact. Upgrade your Doodly skills today!
Mistake #7: Smoothly End Your Tracks!
When you add music or a sound effect to your presentation, it often doesn’t match the duration of your video. But no worries, we have a solution! Shortening the track is the key.
One common mistake is leaving the track to end abruptly, which can make your video sound and look unprofessional. To avoid this, simply follow these steps: right-click the end of the track, choose “Fade Out,” and watch the magic happen!
By applying the Fade Out effect, you’ll see an arrow pointing to the right. You can hover your mouse over it and drag the vertical line to the left if you want the sound to slowly fade as it ends.
Check out this video to see how to shorten your audio track and apply the fade-out effect:
Mistake #8: Fine-Tune Your Music Volume!
Another mistake beginners often make is leaving the music volume at the default setting, which can lead to overpowering sound. But fear not, we’ve got the solution.
By adjusting your audio volume, you can ensure a clear voiceover that doesn’t get drowned out by the music. Just click on the speaker icon within the timeline. Typically, a volume level of 12% to 19% is perfect for a balanced voiceover, but feel free to experiment and find what works best for you.
In a nutshell…
Step 6: Move the Car.
- Built-in scenes are a breeze to use, but don’t forget that you can also customize them. Change the font, reposition your assets, adjust the alignment, add color, and import characters. The possibilities are endless!
- No need to draw every prop and character in pre-built scenes. Save time by focusing on the important elements you want the hand to draw, while the background like walls and small props can appear instantly.
- Remember to add extra time at the end of each scene for your voiceover, creating a seamless transition. It’s all about making your animation look polished and professional.
- Add your own characters to the mix. Whether it’s a gif, png, jpg, or svg file, you can have fun and spice up your scenes.
- Creating draw paths for your imported images makes your animation consistent and realistic. It’s the small details that make a big difference.
- If your images appear different in color after being added to the scene, you may need to invert the color. This is particularly useful when using a chalkboard background. And don’t worry, we’ve already updated this feature to minimize such issues.
Don’t forget to apply fade-out effects to your audio tracks for a smooth ending to your music. And most importantly, adjust the audio volume to achieve a balance between your music and voiceover. Clear communication is key to delivering your presentation’s message.
Insights:
While learning the software on your own is great, having a solid understanding of the basics of Doodly will greatly enhance your experience. You’ll be able to create animations faster and with ease.
In addition to our tutorial videos, our support page is here to answer any how-to questions you may have.
We hope you enjoyed our blog today. Until next time!