
Free
How to Create a Whiteboard Animation Video in 10 Simple Steps
Are you ready to create an engaging whiteboard animation video? Great choice! Whiteboard animation videos are 20X more engaging than traditional ones, making them perfect for entertainment, education, and marketing success.
But before you jump into creating your video, it’s important to have a plan. That’s where this blog post comes in. We’ll guide you through a simple, step-by-step process to create your own whiteboard animation video.
Let’s dive right in!
Step 1 – Write Your Video Script (Optional)
Before you start creating your whiteboard animation video, you can choose to write a video script. Think of it as a roadmap that will guide your video and help you achieve your objectives.
Identify Your Video’s Objectives
To begin writing your script, consider your video’s objectives. Ask yourself:
- What do you want your video to achieve?
- Who is your target audience for this video?
- What action do you want viewers to take after watching?

Once you have clear answers to these questions, you’ll have a solid understanding of who your video is for and what it needs to accomplish.
Decide How to Create Your Script
Once you know your objectives, it’s time to create your video script. You have a few options:
Write It Yourself: This is the most budget-friendly option. To get started, check out what your competitors are doing and watch successful whiteboard animation videos for inspiration. Don’t worry if it feels overwhelming – there are other options!
Hire a Writer: If writing isn’t your forte or you want to save time, consider hiring a professional copywriter. A good copywriter will create a script that captivates your audience, highlights the benefits of your solution, and drives conversions. Prices vary, but expect to spend $50-$250 for a 1-minute video script.
Use Copywriting Software: If you want to skip the writing process altogether, try Automatic Script. Just answer a few questions about your brand and it will generate a high-converting video script for you. Plus, you can use it for email campaigns and Facebook ads too!
Choose the method that suits your budget and comfort level, and once you have a script you’re happy with, it’s time for the next step: storyboarding!
Step 2 – Sketch Your Video
Storyboarding involves sketching out your video, indicating the scenes that align with your script. You can also include camera directions for added clarity. Here’s an example of what a storyboard might look like:
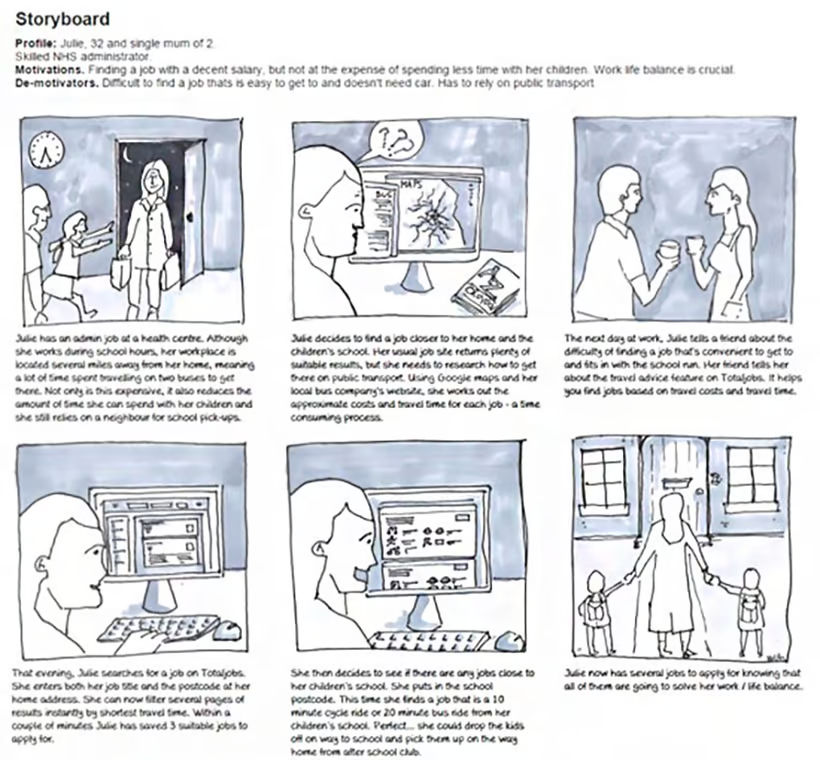
With these two steps completed, you’re on your way to creating an amazing whiteboard animation video. Stay tuned for the next steps in our guide!
Discover the Power of Storyboarding for Your Videos
If you want to create a great video, storyboarding is a critical step that you shouldn’t overlook. It allows you to visualize how your scenes align with the script and ensure a seamless flow.
Imagine starting your whiteboard video with an intricate background. While it may look impressive, it will also take time for the hand to draw. By storyboarding, you can allocate enough time in your script for this scene.
Alternatively, if your script lists 10 benefits of your solution, you’ll want to use simple images that can be drawn quickly. This prevents unnecessary pauses in your voiceover as you wait for the hand to finish drawing.
Now, remember that with Doodly, you have control over the speed of drawing for each object. But in general, having a well-paced video enhances its professionalism. This is why storyboarding is crucial before you start animating.
Storyboarding also allows you to share your ideas with your team visually. Instead of just imagining how the final video will look, you can put your ideas on paper and get everyone on the same page.
So, how do you storyboard?
Sketch By Hand: Grab a pencil and paper, and create a square for each scene. Roughly sketch the images you want in each scene and write down the voiceover text at the bottom. It’s simple and effective.
Use Storyboarding Software: If you want a more formal presentation for your video concept, consider using storyboard software. It allows you to create quick illustrations, add voiceover dialogue, and specify scene duration. There are many free and affordable options to choose from, like Storyboarder and Plot.
Now that you have your script and storyboard, it’s time to record your voiceover.
There are a few options available:
Record It Yourself: This option is free and gives you the flexibility to record whenever you want. However, keep in mind that reading scripts may not be everyone’s strong suit. Voice modulation and tone are important for the quality of your video.
Hire a Voice Actor: If budget permits, a professional voice actor can elevate the quality of your voiceover. They bring a level of professionalism that can lead to more engagement and sales. Expect to spend around $100-$250 for a 1-minute voiceover with full commercial rights.
Use Text-to-Speech Software: Text-to-speech software has made significant advancements in recent years. While it may not sound as lifelike as human speech, it’s a cost-effective option. Talkia offers a wide range of voices in various languages and can help you find the perfect voice for your video.
No matter which option you choose, Doodly makes it easy to create high-quality, professional videos that captivate your audience.
Step 4 – Choose Your Video Background: Discover the Perfect Background for Your Whiteboard Animation Video!
So, you’ve decided to create a whiteboard animation video, but did you know that you have multiple options for your background? Doodly offers four styles: whiteboard, blackboard, glassboard, and custom. Let’s explore each one!
Whiteboard: The Most Popular Choice
The classic whiteboard is a favorite among creators. It’s just like the ones you find in offices. Check out this example of a Doodly whiteboard video to see it in action.
Blackboard/Greenboard: A Nod to Classroom Lessons
If you want that nostalgic classroom feel, the blackboard or greenboard option is perfect for you. It’s like having a teacher present a lesson. Take a look at this Doodly video to see it in action.
Glassboard: A Modern Twist on the Whiteboard
The glassboard offers a unique twist. Objects on the screen are transparent, and the hand appears behind the drawing. This Doodly video showcases the glassboard style.
Custom: Unleash Your Creativity
With Doodly, you can even create your own custom backgrounds. Whether you prefer chalk or marker as your drawing tool, or even want a custom image or color as your background, the possibilities are endless. Watch this Doodly video to see a marker on a custom blue background or this one with a checkerboard pattern as the background.
Step 5 – Adjust Your Video Settings: Make Your Video Perfect!
Now that you’ve chosen your video background, it’s time to fine-tune your video settings to make it exactly how you want it. Doodly offers a range of options for customization. Let’s take a closer look.
Hand Style: Choose Your Perfect Hand
Do you want a real hand, cartoon hand, or no hand at all? With Doodly, you have a wide selection of male and female hands in various ethnicities. You have full control over your drawing style.
Scene Settings: Control the Flow
Doodly lets you select the transitions in your video. Choose whether the video stops when the animation ends or let it play until both the animation and audio finish. You can also decide how scenes transition, whether the hand swipes or not.
Erase Mode: Perfect Your Overlapping Images
When images overlap in your video, you have several options for erasing them. Choose between automatic erasing with Doodly’s Smart Mode, erasing with a finger or an eraser, or no erasing at all.
Video Resolution: Select the Best Quality
Doodly allows you to adjust the resolution of your video. Choose from 480p – 1080p or even select a custom option. If you want to optimize your video for Facebook and Instagram, Doodly has you covered.
Step 6 – Upload Your Voiceover: Make Your Video Come Alive
To add a voiceover to your video, simply click on the blue Plus button in the Sounds tab. Navigate to your voiceover file, give it a title, and click Continue. You can also record your voiceover directly in Doodly if you prefer.
Once your voiceover is in the Doodly library, you can easily drag it to the video timeline. You can even choose from over 100 music files provided by Doodly to enhance your video.
Step 7 – Animate Your Video: Bring Your Creations to Life
Now for the fun part – animation! Utilize Doodly’s vast library of assets and drag and drop them onto your screen. The hand will automatically know how to draw them. With countless images and backgrounds, you can create the perfect scenes for your video in no time.
Start creating your captivating whiteboard animation video with Doodly today!
Get ready to dive into the world of Doodly! With our Standard membership, you’ll have access to over 1,000 characters (or 3,959 with Doodly Enterprise). Trust us, we’ve got characters to represent every profession, age, and ethnicity you can think of.
But wait, there’s more! Our characters are involved in all sorts of activities, so you’re guaranteed to find the perfect images for your video.
Spice up your videos with props! We offer over a thousand different props for you to choose from.
But we don’t stop there. You can also upload your own images to our library. Our patented SmartDraw technology™ will help the hand draw them perfectly in your animation.
Once you’ve created your animation scenes, you may realize that the timing is off. No worries! Our timeline editor allows you to easily speed up or slow down scenes to match your voiceover. Just drag the right edge of the scene in the timeline, and voila!
Want to see how your video is shaping up? Preview it with ease. You can preview individual scenes by right-clicking on them or preview the entire video by clicking the blue Preview button.
When you’re ready to show off your masterpiece, save and export your video. It’s as simple as clicking the Save and Export buttons. Choose the destination, file format, resolution, and quality, and you’re good to go.
Now that you’ve got the hang of it, you’re all set to create amazing whiteboard animation videos. And if you run into any issues, no sweat. We’ve got tutorials, a Facebook group, live chat, and a support desk to help you out.
So, what are you waiting for? Start creating your first animated whiteboard video today with Doodly!


