Free
Timeline Basics
Welcome to Doodly, where all our video magic happens! If you want to create an amazing whiteboard animation, you need to know the ins and outs of our timeline. Today, we’ll dive into the main features and how to customize them.
Let’s break it down. Here are the 4 main features you’ll find in the timeline:
1. Pan & zoom: Get up close and personal with your content.
2. Scenes: Add more depth and variety to your video.
3. Track settings: Fine-tune every element of your video.
4. Voice recording: Add your unique voice to the mix.
You’ll find your timeline at the bottom of the edit video screen. It’s your command center for creating a top-notch presentation.
Adding Another Scene

In our previous blogs, we focused on a single scene. Now, let’s level up by adding more. Just click the “+” sign next to the first scene in the timeline, and voila! A new scene appears with a blank whiteboard ready for your creativity.
Let’s make this scene amazing. Start by adding some props. In the video, we added a table, a beach umbrella, and a beach ball. We even flipped our character to face the right for a fresh angle.
Now, let’s add some text to bring our scene to life.
Adding Texts

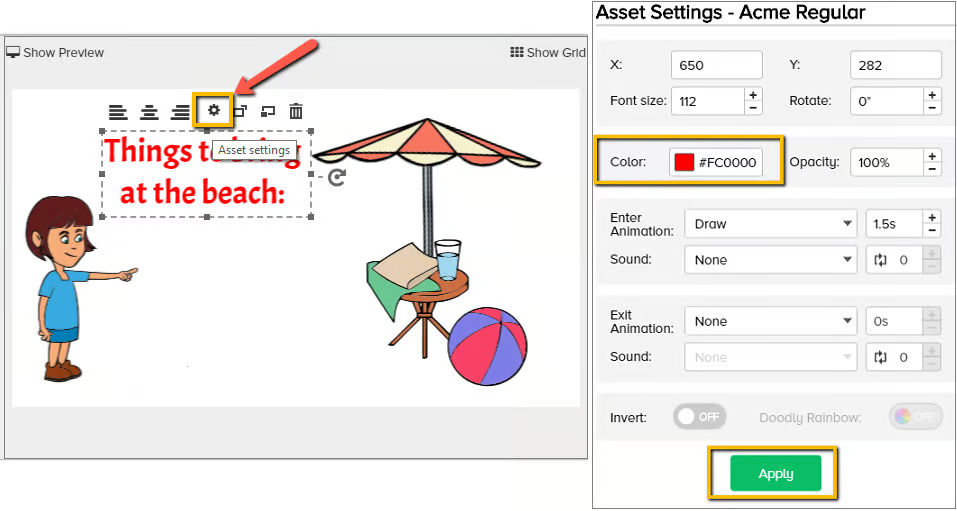
To add text, simply click the text tab in the assets panel. Choose a style from the list and drag it onto the canvas. You can resize the text by dragging the edges and adjust margins without affecting the size.
For perfect alignment, use the grid. It’s a lifesaver when you have lots of words or images on the screen. The grid calculates distances and keeps everything balanced.
To change text color, select the text and click the gear icon. You’ll find more customization options in the asset settings.
One last touch – let’s add some music.
Adding Tracks
Music sets the mood for your video. Choose a track from your laptop or browse our collection in the assets panel. Our tracks are all royalty-free, so no copyright issues to worry about.
When selecting a track, consider its duration. It’s best to choose one that matches your presentation length for seamless syncing. But don’t worry, you can adjust the video if needed.
To adjust track placement, simply click and drag it to the right spot in the timeline. You can also shorten tracks or add fade-in and fade-out effects.
And hey, if the music is too loud, no problem! Click the speaker icon to adjust the volume and make sure it complements your voice-over and sound effects.
Want to add more tracks or sound effects? Just click the three dots next to the volume icon for more options.
Enhance Your Presentation with Voice-Over
Adding a voice-over to your presentation is a breeze. Here are two simple ways to do it:
1. Import a pre-recorded audio file by clicking the “+” sign and selecting the file from your laptop. You can also drag and drop the file into the “add new sound” popup.
The imported file will automatically appear in the “My Library” category of your Sounds list.
2. Record your own voice by clicking the “+” sign. A narration box will appear with microphone control. Start recording by clicking the mic icon and delete it with the “x” icon.
Just like other audio files, you can move your recording to any desired point in the timeline, trim the beginning and end, or add fade-in and fade-out effects.
Capture Attention with Pan & Zoom
With the pan & zoom feature, you can direct the camera to highlight specific points in your presentation. Here’s how to set it up:
- From the timeline, click the “+” sign to create a small box with “fx” and “x” on it.
- Click “fx” to access the pan & zoom settings.
- Adjust the Start frame to zoom out and the End frame to zoom in. You can adjust them independently.
- Unlock and adjust the edges of the start frame. Preview the changes with the “Show Preview” button and hit Apply when satisfied.
For slower transitions, adjust the pan & zoom duration in the timeline.
Experience the Difference with Pan & Zoom
Pan & zoom takes your video to the next level, surpassing typical fade-in and fade-out transitions.
Summary:
These are just a few of the exciting features available in Doodly’s timeline. Whether it’s panning & zooming, adding scenes, or incorporating background music and voice-overs, Doodly offers endless creative possibilities. What’s your favorite feature? Stay tuned for more Doodly updates in our upcoming blogs. Happy video making! Until next time. 🙂


