Free
How to Make an Animated Explainer Video
Want to make an amazing animated explainer video but feeling a bit overwhelmed? No worries, we’re here to help! In this guide, we’ll walk you through the step-by-step process of creating a great animated explainer video.
Step 1: Write the Video Script
Before you get started with creating your video, you need a script. It’s the backbone of your video and sets the foundation for everything else.
The Script Formula
Most successful animated explainer videos follow a specific formula:
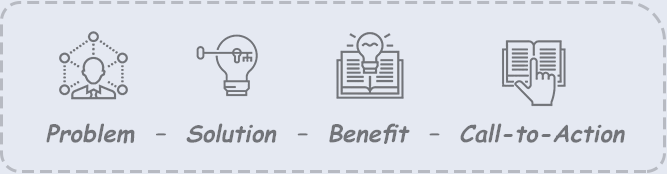
Problem:
Start by highlighting a problem that your customers experience. This grabs their attention and sets the stage for your solution.
Solution:
Introduce your solution and explain how it solves the problem. Be sure to mention your product’s name twice to increase brand recall.
Benefit:
Showcase the benefits of your product or service. How will it improve your customers’ lives? This is your chance to shine.
Powerful Call-to-Action:
End with a strong and clear call-to-action. Tell your viewers exactly what you want them to do next, like visiting your website or downloading an app.
Writing a script might seem daunting, but it’s not so hard. You can also use tools like Automatic Script to simplify the process.
Once you have a script you’re happy with, it’s time to move on to the next step.
Step 2: Bring Your Story to Life with a Storyboard
Ready to take your video to the next level? It’s time to create a storyboard! This step may seem daunting, but trust me, it’s worth it. Here’s why:
Keep Your Pace in Check: When visualizing your script, you’ll notice if certain scenes have too many or too few words. This helps you create a balanced and engaging video.
Stay Organized: Avoid the risk of making something rushed and incomplete. Planning in advance ensures a better end result.
Get Your Team on Board: Your brilliant ideas may be stuck inside your head. By creating a storyboard, you can share your vision with your team and get everyone excited about the final product.
Remember, storyboarding is a crucial step you don’t want to skip! So, how do you create one? You can either draw it by hand or use free software like Storyboarder.
Step 3: Bring Your Script to Life with Professional Voice-Over
It’s time to bring your video to life with a captivating voice-over! But hold on, instead of doing it yourself, it’s best to hire a professional. Here’s why:
They’re the Experts: Let’s face it, voice actors have the skills to deliver the right pitch, inflection, and tone. Don’t settle for anything less when it comes to your video’s audio quality.
Boost Your Brand Image: A poorly recorded voice-over can leave a bad impression of your brand. Ensure your video feels professional and high-quality by hiring a voice actor.
Set the Right Tone: A voice actor adds personality and emotion to your video. Their voice can evoke various feelings, making your video more engaging and interesting to watch.
By investing in a professional voice-over, you’ll create a video that grabs attention and leaves a lasting impact.
Step 4: Gather Graphics and Audio for Your Video
Now, it’s time to collect all the elements you need to make your video shine. While Toonly offers a wide range of graphics and audio, you might want to include some custom elements. Here’s what you need to do:
Decide on Extra Graphics: If there are specific graphics, like your brand logo, that you want in your video, consider creating them using a graphic designer or finding them online.
Consider Music and Sound Effects: Toonly already provides a selection of audio files, but if you want something extra, you can explore other sources for music or sound effects.
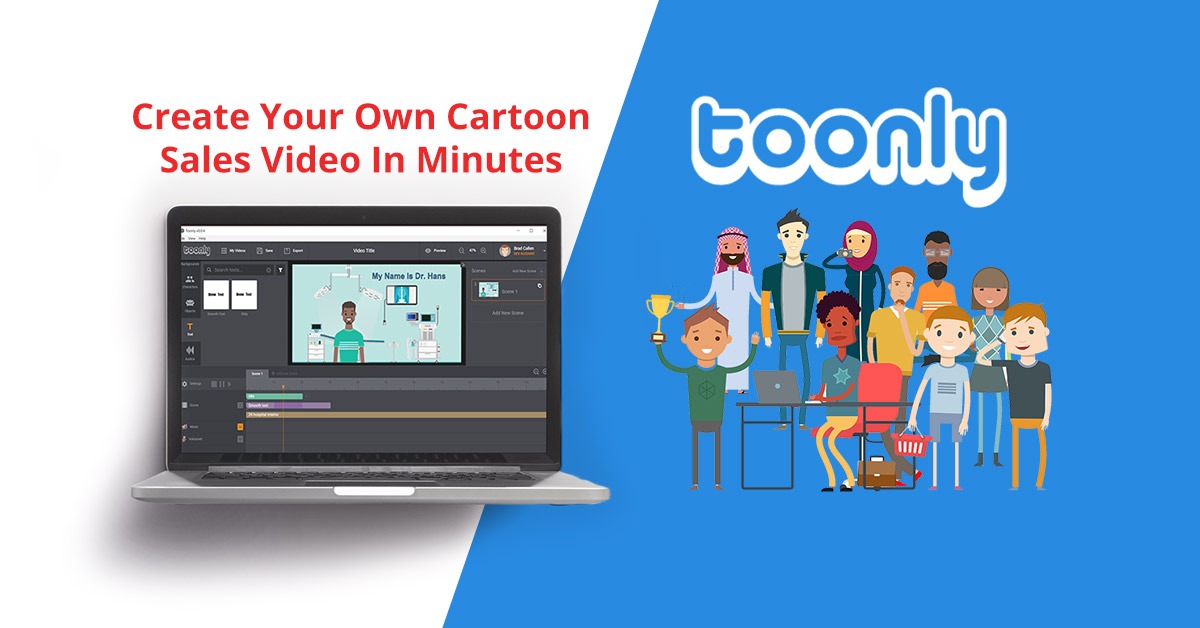
Step 5: Create Your Animated Explainer Video with Toonly
With Toonly, creating an outstanding animated explainer video is a breeze, even if you’re a beginner. Here’s how:
Choose a Background: Toonly offers a variety of ready-made backgrounds to set the scene for your video.
Upload Your Voice-Over and Graphics: Easily integrate your professional voice-over and graphics to personalize your video.
Customize and Perfect: Adjust your scenes, add characters, and make any necessary tweaks to ensure your video looks exactly the way you envision it.
And just like that, you’ve created an incredible animated explainer video using Toonly. It’s never been easier to bring your ideas to life!