Free
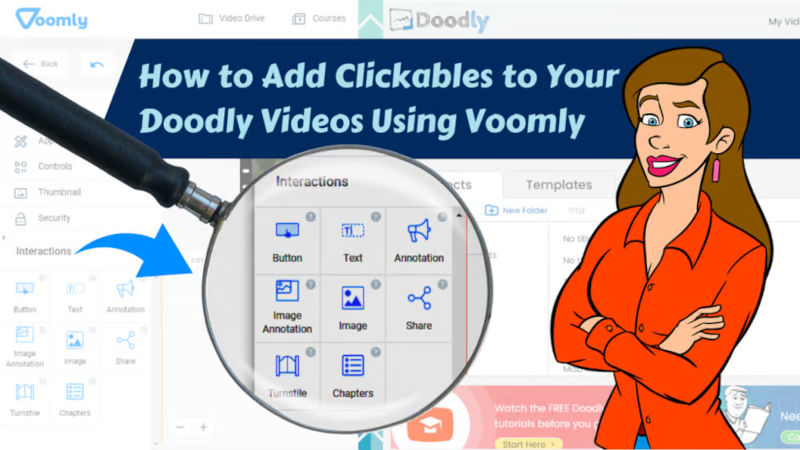
How to Add Clickables to Your Doodly Videos Using Voomly
Learn how to add clickables to your Doodly videos using Voomly, the ultimate tool for boosting engagement and conversions. Say goodbye to boring video content! Are you making an explainer video? If so, then you already have a script and shot list. But how can you make sure your audience can easily access all the information in your video in real-time? The answer is simple – add clickable links!
By adding clickable links to your explainer videos, you can take your audience on an exciting journey as they explore more about your topic. And the best way to do this is through Voomly. As the parent company of Doodly, Voomly is a cloud-based tool that allows you to create amazing online courses and host and sell your Doodly videos.
Clickables aren’t just limited to links. They can also include actions like pausing or unpausing the video, sharing on social media, choosing a chapter, and more. And with Voomly’s video customization features, the possibilities are endless.
To upload your Doodly video, simply click the upload icon on the upper left-hand side of Voomly. You can upload multiple videos at once and easily sort them using different criteria.
Once your video is uploaded, you can access Voomly’s main menus, including Video Drive, Courses, Video Players, Interactive Video, and Analytics. For today, we’ll focus on the Video Players menu.
Within the Video Players menu, you’ll find a variety of features to customize your video. From adding clickables to other great tools, Voomly has everything you need to make your video stand out.
Introducing Voomly’s Video Players Menu!
Discover the incredible features Voomly has to offer for customizing your videos. Our Video Player comes equipped with two menus: General and Interactions. Let’s explore the fantastic options available in each menu.
A. General
Within the General menu, you’ll find the settings for your video player. This menu is divided into Appearance, Controls, Thumbnail, and Security.
1. Appearance
In this menu, you have the power to customize the color and skin of your video player. Personalize the label and even add your own logo to make it truly yours. You can also easily toggle the comments section on and off, giving your player a unique and tailored look that matches your website or blog’s design.
Discover a whole new level of video customization with Voomly’s Video Players Menu.
2. Controls
Take control of your video’s start and end with this menu. Choose whether you want your video to autoplay, so it starts playing as soon as viewers visit your site. You can also decide whether to show or hide buttons on your video player, like the play button or volume button. Plus, you have the freedom to customize the play button, whether you want it bigger, smaller, or even upload your own design.
3. Stand Out with a Custom Video Thumbnail
Want your video to catch everyone’s attention? Our thumbnail menu has got you covered. With the ability to choose a frame from the video, a custom image, or even a loop from the video itself, you have complete control over how your thumbnail looks. Make your video stand out and attract viewers with a personalized thumbnail that represents your content in the best possible way.
4. Keep Your Videos Safe with Password Protection
Want to make sure only the right people can view your video? Our security feature has got you covered! Set up a password for your videos, so only authorized users can access them. Rest easy knowing your content is secure and only visible to the intended audience.
Welcome to the Interactions menu! Here, you’ll find a variety of features that add an interactive element to your videos, making them more engaging and enjoyable for your viewers.
Let’s dive in and explore each of these exciting features:
1. Buttons
Easily add text to your video and customize its functionality. You can choose to unpause the video, link a URL, or simply have the button do nothing when clicked. Move the button anywhere on your screen to create a strong call to action or provide additional information for your viewers.
2. Text
Add informative text to your video presentation. Like buttons, the text feature is movable, allowing you to position it anywhere on your screen.
3. Annotations
These fixed annotations appear at the upper left side of your screen, providing a quick way for your audience to access related information by linking a URL.
4. Image Annotations
Similar to regular annotations, image annotations also appear at the upper left side of your video. Upload your logo or any image you like and link it to a URL. It’s a simple way to add personality to your links.
5. Images
Upload clickable photos to your video. Unlike image annotations, these images can be positioned anywhere on your screen. You can link a URL or use them to unpause the video when clicked.
6. Share
Enable the share button to allow your viewers to easily share your presentation on Facebook, Twitter, and LinkedIn. This helps increase the reach and impact of your video by making it accessible to a wider audience.
7. Turnstile
Collect valuable information from your viewers by asking them to input their details. Turnstile is user-friendly and offers features that help you make the most of the data you collect.
8. Chapters
Keep your viewers engaged and help them navigate through your content by adding chapters to your video. Customize the titles and timestamps to suit your needs, making it easy for viewers to find the information they’re looking for.
In conclusion, Voomly is the perfect tool to add clickable elements to your Doodly videos. With its simplicity and effectiveness, you can enhance your videos by allowing viewers to jump to specific sections without restarting the video. Plus, they can easily go back to any point they want. This makes your Doodly video interactive, stylish, and fun. Give it a try and see the difference it makes!


