
Free
Getting To Know Doodlys Video Settings
Welcome back to our blog! In our last post, we discussed Doodly’s basic features, including pan & zoom, scenes, music, and voice-over settings. Today, we’re diving into another amazing function: Video Settings.
Located above the pan & zoom settings, the Video Settings button is your gateway to a whole menu of fantastic features that we’ll explore together.
But wait, there’s more! In addition to Video Settings, there’s another set of options called Scene Settings on the Edit Video page. The key difference is that Video Settings control the overall settings for your entire video, while Scene Settings are specific to individual scenes.
While we’ve previously given you an overview of video settings, this time we’re going to take a closer look with more detail.
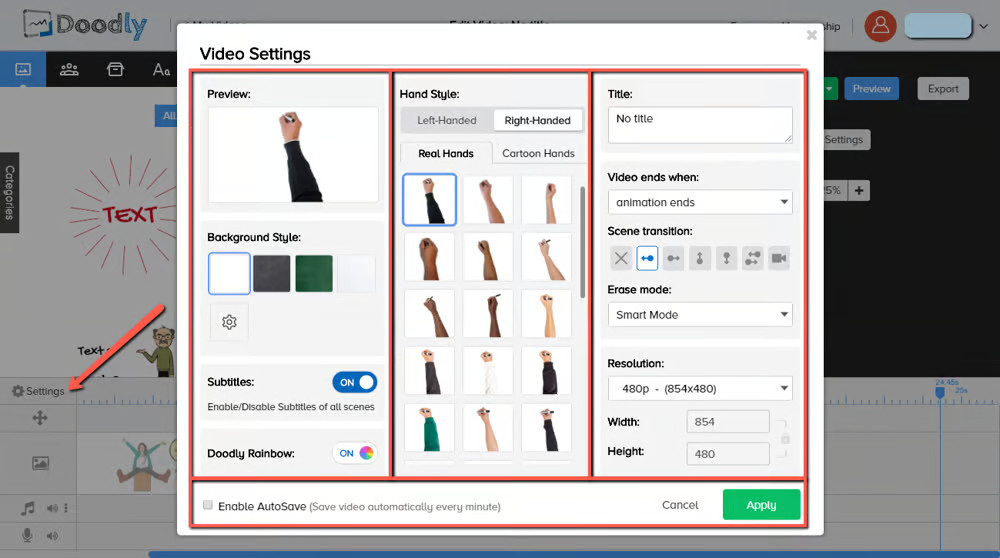
Video settings are divided into three columns, let’s start with the first:
1st Column: Video Settings
In this column, you’ll find Preview, Background Style, Subtitles, and Doodly Rainbow.
A. Preview:
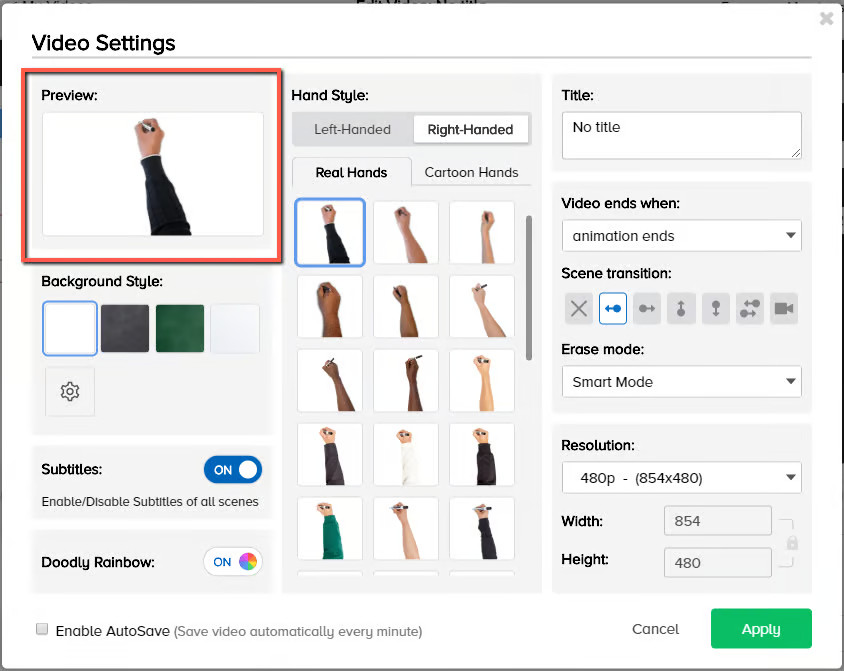
The preview shows the background style you’ve chosen and the default hand that writes on the board. Don’t worry, you can change the hand at any point during your video editing process.
B. Background Style:
This is where you select the style of your board. You don’t have to stress about choosing the perfect background right from the start. Just like the hand, you can change it anytime through this menu. There are six options to choose from:
– Whiteboard:
The default board style that goes well with any characters or scenes.
– Dark Chalkboard and Green Chalkboard: These styles give you a classroom presentation vibe, perfect for teachers creating modules for students.
– Glassboard:
Ideal for corporate functions, business presentations, and sales pitches.
– Custom Color and Custom Image: Use your company logo or choose a specific color theme.
Remember, there are different hand styles available depending on the board style you choose. The number of hand styles has been updated to match the options available for the whiteboard. And don’t forget, with custom color and image boards, you can choose between markers and chalk for your presentation.
C. Subtitles:
This menu allows you to enable or disable subtitles for all scenes. You can input subtitles in the Scene Settings section, enabling or disabling them on a per-scene basis.
D. Doodly Rainbow:
This feature, found in multiple locations within Doodly, allows you to switch between black and white and colored characters, props, and scenes. You can control this option in the Video Settings menu.
2nd Column: Video Settings

In the middle column, we focus on hand styles. The available options depend on the board style you’ve selected from the first column. Here are your choices:
– Left-hand or right-hand
– Real hand or cartoon hand
– For cartoon hand, choose between 2D or 3D hand
– With custom color or image boards, select between a marker or chalk
3rd Column: Video Settings
The final column offers Title, Video ends when, Scene transition, Erase mode, and Resolution Settings.
A. Title: You can edit or change your video title in three different locations, and Video Settings is one of them:
1. My Videos page
2. Video Edit page
3. Video Settings
With these options in your hands, you have full control over the title of your masterpiece.
B. Hey there! Want more control over when your video stops playing? We’ve got you covered.
You’ve got two options to choose from:
1. Video ends when both the animation and audio finish
This is perfect if you want the audio to play till the very end, even if your visuals are already complete.
Hey there! I wanted to mention that if your animation is longer than the music in your presentation, something interesting happens. Even if the background music has already finished playing, all your assets will still be drawn first. Pretty cool, right?
Hey there! We’ve got a cool feature for you. When you choose this option, your audio file will stop playing as soon as your animation is finished, even if the audio track itself isn’t done playing yet. Pretty neat, right?
C. Hey there! Let’s talk about scene transitions in your presentation. These cool effects add some animation and flair when you’re moving from one scene to another.
Now, you have seven options to choose from:
1. None
2. Swipe Left
3. Swipe Right
4. Swipe Up
5. Swipe Down
6. Swipe Mixed
7. Camera Panning
By default, the swipe left transition is selected, but feel free to switch it up and choose any of the other transitions above. Give your presentation that extra wow factor!
D. Introducing Doodly’s Erase Mode!
Erase Mode is a cool feature that adds an extra dynamic to your presentations. It automatically creates an erase animation when one image is on top of another. Super smooth and eye-catching!
It’s important to note that Erase Mode is only available with certain illustrators and hand styles. But don’t worry, if you don’t want to use Erase Mode, you can easily turn it off by selecting “off” from the erase mode dropdown options.
Let’s explore the 4 options available for Erase Mode:
1. Smart Mode
This is the clever combination of the finger and eraser erasing the image. If it’s just a small corner that overlaps, the finger takes care of it. But when a larger object overlaps, the eraser comes in and does its magic.
2. Erase with Your Finger
Choose this option to see your finger magically erase a overlapping image.
3. Erase with Ease!
Choose this option to effortlessly remove any unwanted overlapping images. Watch as the eraser flawlessly blurs away the excess, leaving your project looking perfect.
4. Off
Selecting this option disables the erase mode so you will just see everything being drawn by handOption 4: Turn Off “Erase Mode”!
When you choose this option, you won’t miss a single stroke of the drawing process. Say goodbye to erasing and enjoy the authentic hand-drawn experience.
E. Hey there! When you’re creating a new video, along with choosing the board style and title, you also have the option to select the resolution.
We offer 6 different resolution options for you to choose from:
– 360p (640×360)
– 480p (854×480)
– 720p (1280×720)
– 1080p (1920×1080)
– Facebook & Instagram (1000×1000)
– Custom
When you customize the resolution, the height will automatically adjust as you change the width. But if you want to use specific dimensions, no worries! Just click on the lock key and input your preferred resolution.
And don’t worry about losing track – you’ll see the adjusted resolution right on the preview screen.
Hey there! Did you know that there are 3 locations in Doodly where you can customize your video resolution? Let me break it down for you:
1. Create New Video: This is where you can start a brand new video project and set your preferred resolution.
2. Video Settings: Here, you have even more control over your video resolution. Plus, there’s a cool feature I’ll tell you about in a sec…
3. Export screen: Once you’re done creating your video, you can export it here and choose the resolution you want.
Now, let’s talk about that awesome feature I mentioned earlier. It’s called AutoSave, and it’s a lifesaver! With AutoSave, you don’t have to worry about losing your hard work. It automatically saves your progress every minute. Pretty cool, right? To enable AutoSave, just check the box next to “Enable AutoSave” and hit Apply.
So there you have it – the amazing features you’ll find in Doodly’s Video Settings! I hope this helped you get familiar with each tool. By the way, we’d love to know which menu within Video Settings is your favorite. Let us know! And if you haven’t tried Doodly yet, what are you waiting for? Go ahead and give it a spin. We promise you won’t be disappointed! 🙂


