Free
How to Use Doodly’s Preset Scenes
When it comes to creating scenes in Doodly, there are two important areas to consider. The first is the timeline, where you can add blank canvases called “scenes”. The second is the assets panel, specifically the “Scenes” tab, where you can find a variety of preset scenes ready to use.
While it’s great to import your own assets and build scenes from scratch, the preset scenes offer incredible convenience for Doodly users. These scenes come pre-designed with backgrounds, props, characters, and gestures, all with their own draw paths. No more scribbling diagonally!
In this blog, we’ll dive into everything you need to know about Doodly’s preset scenes.
Introducing the Presets
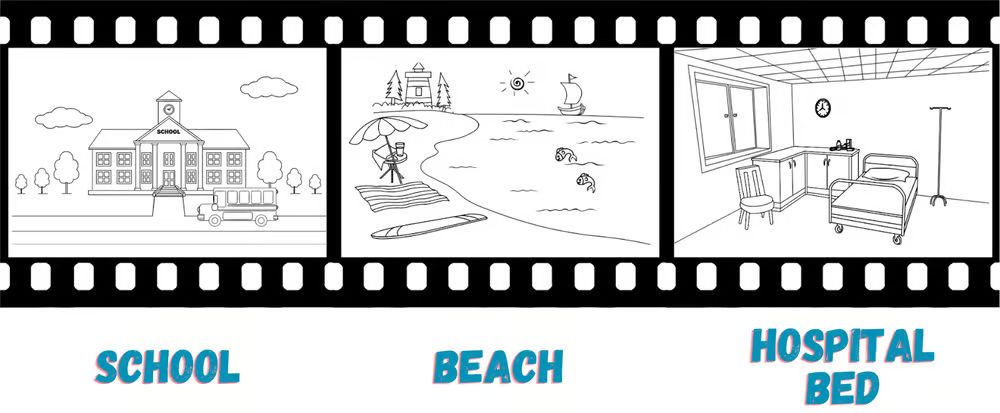
Let’s start by exploring the assets panel. In the Scenes tab, you’ll find a wide range of preset scenes to choose from. Whether you need living spaces, offices, schools, or even beaches and transportation settings, we’ve got you covered.
Check out a few of these impressive presets below:
[Include images here]
And these are just a taste of what Doodly has to offer.
Using a Preset Scene
So how do you actually use these preset scenes in Doodly? It’s simple! Just drag and drop a preset into an empty scene. Be sure to use an empty scene, as Doodly will prompt you to replace the contents of a current scene otherwise.
Let’s take a closer look at the scene we selected.
We’ve added a living room with various props. Now, let’s see how it looks when played:
Notice how the hand draws each item individually. While this may be suitable in some cases, you might want to adjust the drawing time and keep the scene concise. In the selected scene, it takes approximately 45 seconds to draw everything out, which can be time-consuming. Unless your story truly requires it, a shorter drawing time is often preferred.
Customizing the Preset Scene
To shorten the drawing time, we can adjust the Duration for each asset.
On the right side of your screen under Layers, you’ll find all the assets in your scene, each with a Delay and Duration. By default, each item has a duration of three seconds. This means that even a small umbrella, for example, will take three seconds to finish being drawn.
But in our example, we don’t need everything to be drawn by hand. Let’s keep the background wall pre-drawn by setting its duration to zero. We can also identify other assets that don’t need to be drawn and set their duration to zero as well. For instance, if our video is about a moving company delivering sofas, we can have everything pre-made except for the two sofas, which will be drawn by hand.
Remember to place the two sofas at the end of the Layer menu, so they are drawn last.
Let’s see how our presentation looks now:
After the first scene, the second scene enters with all the props pre-drawn, except for the two sofas.
Get Ready to Customize Your Scenes!
Our preset scenes are amazing because you have total control over every object in your scene. Want to flip a prop or drag it in a different direction? No problem! You can even delete or replace props and characters to make your scene perfect.
But wait, there’s more! Let’s explore the possibilities with our presets by adding a brand new scene.
Imagine an old lady shopping at a grocery store, ready to pay for her groceries. If you love that scene just the way it is, you don’t have to change everything. Instead, you can selectively copy and paste assets from your current scene to create a fresh scene. Just hold down CTRL on your Windows keyboard while selecting the assets you want to copy, then paste them into a new scene.
Once your assets are in the new scene, you can make them larger or smaller to fit your vision. Picture the old lady standing behind the shelves, contemplating all the options. To add even more depth, you can flip the character and place text above her. Now she looks overwhelmed by the countless product choices available.
To rearrange your scenes, simply move the new scene you created before the checkout counter scene. This way, you can show the old lady making her decision and then checking out.
And if you want to highlight a specific character, like our old lady, you can adjust the opacity of the other assets. This puts the spotlight on your character. To take it up a notch, try adding text or applying the pan and zoom effect for an extra touch of visual flair.
In conclusion, our preset scenes are flexible, stylish, and make creating Doodly videos easy and enjoyable. We hope you’ve enjoyed our blog today! If you haven’t tested out these scenes yet, give them a try in your next project and let us know what you think. Share your creations with us on our Facebook page. Until next time, happy doodling! 🙂


