
Free
Discover the Power of Voice-Over in Doodly
Unlock the magic of voice-over animations with Doodly! Learn how to create powerful video content that will engage your audience with this helpful guide. Looking to take your business promotions to the next level? Video content is key, especially when it comes to marketing. In fact, studies show that 64% of consumers are more likely to make a purchase after watching a video. That’s why an effective voice-over is crucial for capturing your audience’s attention.
Not only does voice-over add a sense of identity to your videos, but it also helps you connect with your viewers on an emotional level. By using the right tone, volume, and pitch, you can evoke the desired emotions and make your brand, products, or services relatable.
Sometimes, graphics alone aren’t enough to explain complex concepts. That’s where voice-over comes in, allowing you to express your ideas clearly and effectively. Plus, with voice-over, you can easily introduce your products or services to a global audience and reach more people.
Today, we’ll dive into Doodly’s voice-over capabilities, exploring how to add voice-over to your videos and sharing some expert tips for creating your own.
Adding Voice-Over in Doodly: Two Simple Methods
There are two ways to incorporate voice-over into your Doodly videos. The first option is to record your voice-over directly in Doodly, while the second option is to import a pre-recorded voice-over.
You can choose to add your voice-over before or after working on your scenes—both methods work perfectly fine. However, if you add your voice-over before completing all scene edits, syncing your voice-over with the video becomes much easier.
Option A: Recording Voice-Over within Doodly
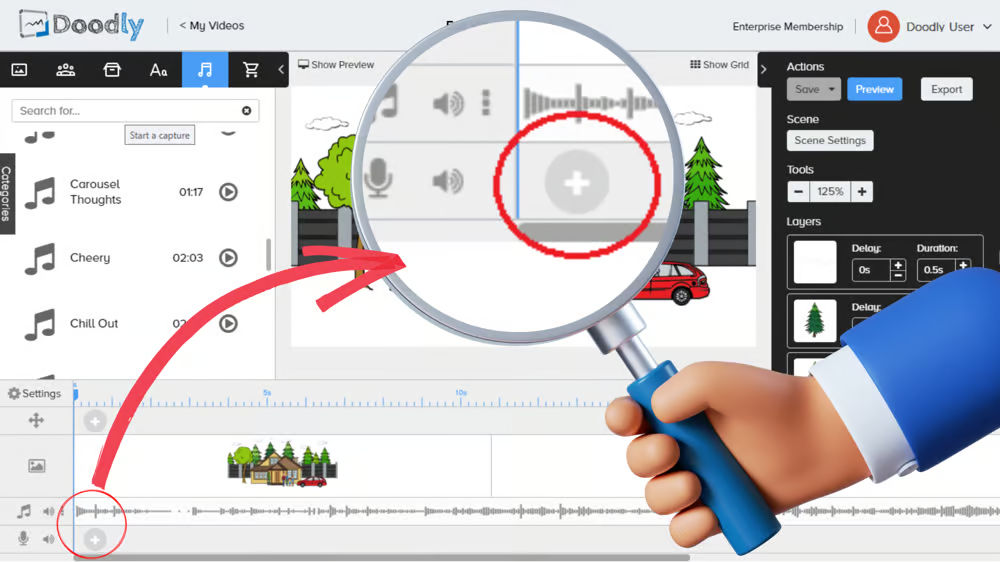
In most cases, it’s best to record your voice-over within Doodly after finishing all scenes. To get started, simply locate the mic icon within the timeline and click the “+” sign. Once you click the red mic icon, your recording will begin.
As the scenes with subtitles play, read along and record your voice-over. You can stop the recording by clicking the red mic icon again.
Remember, your recordings are automatically saved under Sounds in your assets. If you need to make changes or start over, feel free to do so. Just make sure to delete any previous recordings to avoid confusion.
Option B: Importing Pre-Recorded Voice-Over
Alternatively, you can import your own voice-over file at any point while working on your video. It’s recommended to add your voice-over before working on scenes to ensure proper syncing. Timing is everything when it comes to voice-over, so you want to avoid your voice-over starting too early or lagging behind your scenes.
Let Doodly and the power of voice-over elevate your video content and captivate your audience.
Importing a Sample Voice-Over in Doodly:
Follow these simple steps to import a voice-over into Doodly and start syncing it with your scenes.
1. Go to the assets tab and select Sounds. Click the “+” sign to add a new sound.

2. In the “Add new sound” pop-up box, click “Browse Files” to locate the voice-over on your computer and select it.
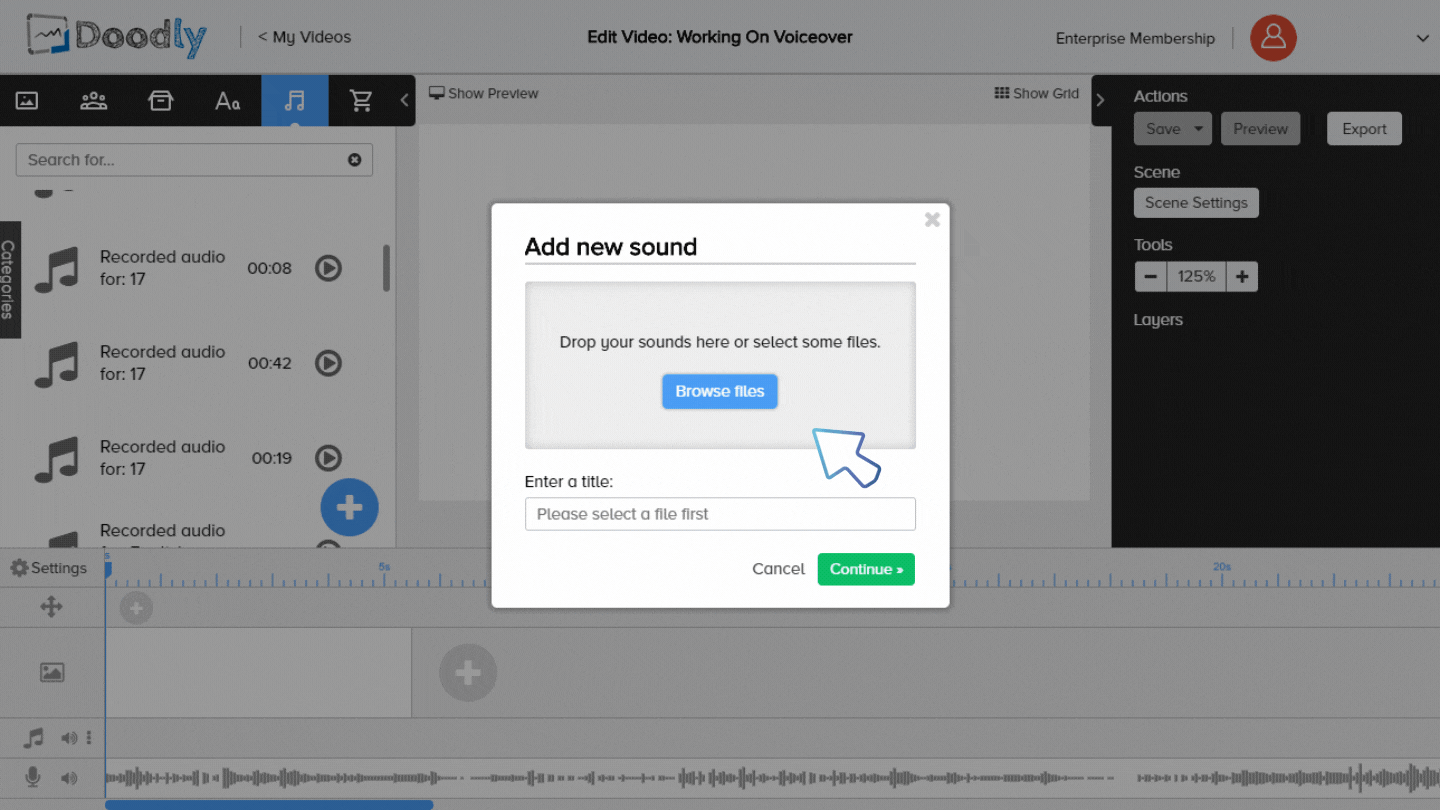
3. Click “Continue” to import the file.
Having trouble uploading? Try moving the file to your Downloads folder and try again. Also, remember to set a clear title for your voice-over to easily locate it in your Sounds assets.
If your Sounds asset is set to the category “All”, the imported file will be placed on top of your tracks in alphabetical order. If you can’t find it, switch to the category “My Library” and it should be there.
4. Drag your imported track to the voice-over field in the timeline.
Congratulations! You have successfully imported your voice-over.
Now let’s start syncing it with your scenes.
To ensure accurate timing, click “Show Preview” and minimize or hide the assets and actions pane. Play the preview as you check the voice-over timing, making any necessary adjustments to the scene or voice-over.
You can add preset scenes or import your own assets to build your scenes. Once you’ve edited your scene, adjust the voice-over to match its duration.
For example, if your animation lasts 33 seconds but the voice-over is only 18 seconds, you have two options. You can either repeat the voice-over to fill the entire duration or adjust the scene to match the voice-over. The latter is easier.
To adjust the scene, go to the timeline and move the end portion of your first scene back to 18 seconds. Preview the scene again to ensure it’s in sync with the voice-over. Repeat this process for additional scenes.
Dealing with Voice-over Gaps:
If you have unnecessary gaps in your voice-over, you can fix them without having to rerecord.
Here’s how:
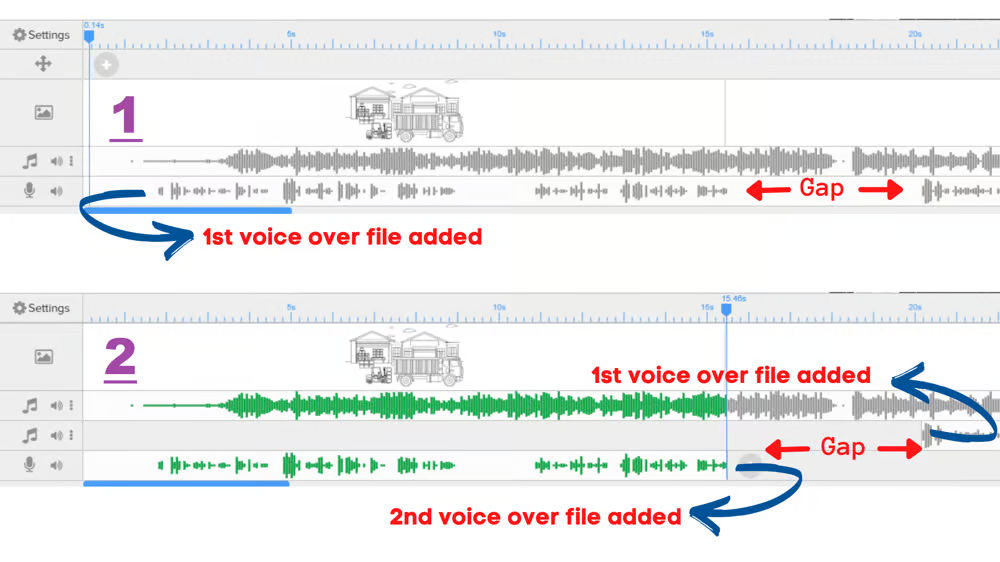
Identify the gaps in your voice-over and make note of them.
We want our voice-over to sound professional and confident, so it’s important to eliminate dead air and awkward pauses. Identify these gaps in your voice-over.
Crop the voice-over to remove the gaps.
Once you’ve identified the gaps, shorten the voice-over by dragging the end of it to remove the gaps and ensure a seamless and appealing narration for your video.
Use the playhead to mark the timeline, so you know exactly what to keep and what to cut.
Add an extra voice-over field in the timeline.
By default, there are two audio fields in the timeline: one for background music and one for voice-over. If you need to add more sound effects or music, you can add additional audio fields.
To add a new field, locate the three dots in the timeline within the Sounds field and select “Add track.”
Add the same voice-over file to the new audio field.
Locate the same voice-over file in the Sounds assets, and place it in the newly added audio field.
Crop the added voice-over to remove the corresponding gaps.
Remove the start of the voice-over until the gap portion that needs to be removed from the recording.
Now the gap should be closed. When you preview your scene, it will play the second voice-over, playing only the first part, and continue narrating using the first voice-over, without the gaps.
You can repeat this process for other gaps if needed. Consider using apps like audacity for easier navigation if you have multiple gaps to remove from your voice-over.
Looking for some voice-over tips? We’ve got you covered! Whether you’re a beginner or a pro, these practical tips will help take your voice-overs to the next level.
1. Get the right equipment
Using a microphone is essential for high-quality recordings. Choose a location with minimal echo to ensure clear sound. Unlike singing, voice-over requires a clean and unaffected sound. Save the echo for storytelling purposes!
2. Master audio clarity and volume
Select a quiet room to record in, free from background noise. Avoid distractions like barking dogs or chatting people. And remember, balance is key! Make sure your voice is not drowned out by any background music or effects.
3. Pace yourself and sound natural
Communication is key, so don’t rush! Speak at a comfortable speed and remember to breathe and pause when necessary. Keep your audience engaged by sounding animated and confident, without crossing into annoying territory. Practice makes perfect, so grab your script and start rehearsing!
4. Perfect your pronunciation and intonation
Building credibility is crucial for a great voice-over. Clear enunciation and proper intonation demonstrate your expertise and belief in the product or service you’re promoting. Avoid filler words and unnecessary pauses to maintain a confident and credible delivery.
5. Practice, practice, practice
Save yourself from frustration by rehearsing your script before recording. Pay attention to pacing and intonation as you practice. If you’re using subtitles, try reading them aloud while watching the video before recording. And don’t forget to take notes on areas that need improvement to avoid repeating the same mistakes.
6. Consider hiring a voice actor
If you want a professional and polished voice-over, hiring a voice actor is always an option. Look for a voice that resonates with your target audience and fits your budget. Check out sites like Global Voice Acting Academy, Voices.com, or Voice123.com to find the perfect voice for your project.
Ready to add voice-overs to your Doodly videos? Give it a shot and have fun! We’d love to see your work, so don’t forget to share it with us. Stay tuned for more helpful tips and tricks!


