
Free
How to Customize Drawing Movements
Have you ever wanted to bring your images to life with realistic hand-drawn animations? With Doodly, you can create your very own draw paths and watch as your pictures come to life!
If you’re already familiar with Doodly, you may have noticed the draw paths included in the preset assets. But did you know that you can also import your own images and add draw paths to them? It’s easy! Simply import your image into Doodly and let the magic happen.
However, imported images don’t come with draw paths automatically. Instead, they are just scribbled diagonally when you preview them. That’s where our detailed blog comes in. Today, we’re going to delve into the finer points and precision of adding draw paths to your images.
Let’s take a look at the difference between preset images and imported images. Preset images are drawn by hand, following the draw lines of the image. On the other hand, imported images are scribbled diagonally, making the image magically appear. But in real life, we want our drawings to be realistic. That’s where draw paths come in.
There are two ways you can create draw paths. You can use a single path for simple images or multiple paths for more detailed ones with curves and lines.
Now, let’s answer an important question our community has asked:
How precise should the drawing paths be? To find out, we’re going to work with two images – a black and white image and a colored one. By applying draw paths to both, we’ll see if the process is the same.
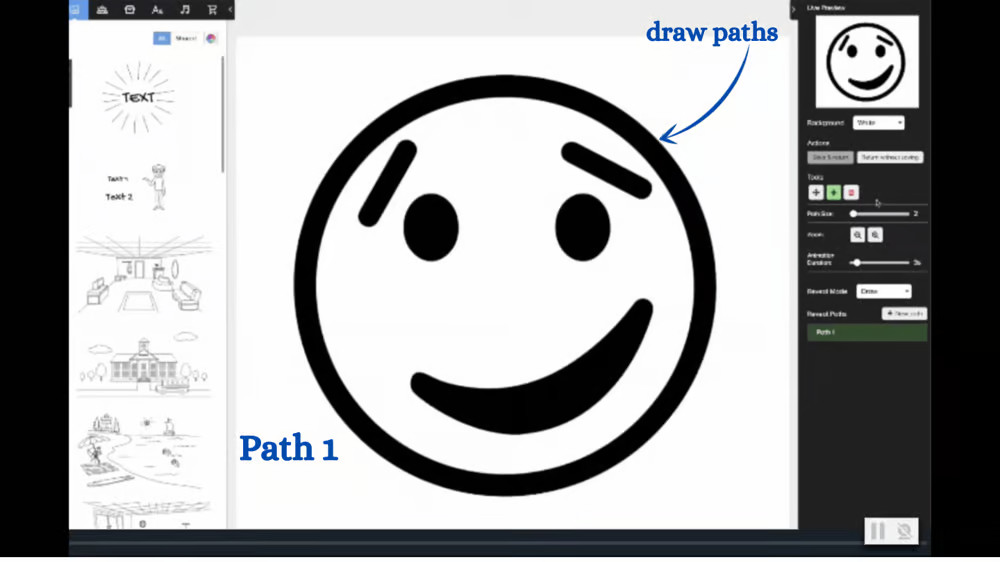
Starting with the black and white image, we used four draw paths to complete the drawing. We made sure to position the draw paths correctly, covering the lines of the image, and adjusting the paths as needed. With a black and white image, the draw paths can be a little sloppy since any accidental touching of other portions won’t affect the final drawing. The black lines blend well with the whiteboard background.
Moving on to the colored image, we realized that more precision is needed. Every part the draw path touches is immediately revealed, so we used eight draw paths to achieve the desired pattern.
Welcome to the Draw Path tutorial! Let’s dive in and learn how to create amazing drawings with precision.
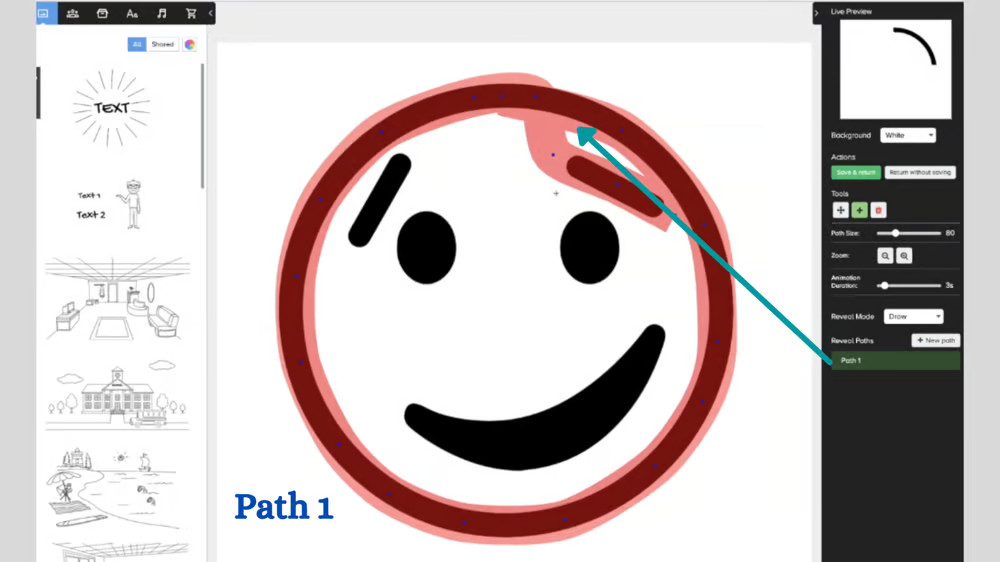
1st Path:
To start off, we placed draw points along the edges of the face in our image. We made the draw path larger to capture as much area as possible. However, we noticed that our initial draw path revealed a small portion of the sunglasses and hair, which we didn’t want. So, we adjusted the start point of the draw path by moving it down a bit. Remember, the tip of the draw path should not touch the sunglasses or hair.
2nd Path:
Next, we added a second path to cover the next portion of the face in our image. However, this created a gap in the drawing. No worries, though! We simply dragged the draw points to close the gap.
3rd Path:
Now, let’s move on to the next path, which applies to the edge on the left side of the face near the sunglasses. Working with angles can be tricky, so we need to adjust the size of our path to ensure it only touches the edges we’re working on. Always keep an eye on the live preview to see if any portions of the image are missing from the draw path. If they are, simply adjust the path once again.
With our chosen image, we noticed that the bottom portion of the black sunglasses is close to the yellow colored face. We don’t want the black lines to show in our drawing of the face. To fix this, we dragged the draw path away from the edges of the sunglasses.
Remember, it’s okay to leave a small gap between portions of the image that have different colors, such as the sunglasses and the face. You can easily cover these gaps when you start adding a draw path to the top portion of your image.
Another challenging area to apply the draw path is the middle portion of the face, between the eyes. To avoid touching the black sunglasses, we placed tiny dots of draw path instead of dragging it. We carefully extended some paths, ensuring they did not touch the sunglasses.
Sometimes, even with careful adjustments, the live preview may still capture unwanted edges. In our example below, we fixed the black dots showing by dragging the draw path away from the sunglasses.
4th – 6th Path:
Now, let’s move on to the next set of draw paths. These were easier to plot since both sides of the path were the same yellow color, and they wouldn’t touch the black sunglasses. We also adjusted the path size to cover more area of the face.
7th – 8th Path:
We’re down to the last two paths. First, we applied the draw path to the upper portion of the sunglasses, near the forehead. Carefully sizing the draw path, we ensured it only covered the upper part of the sunglasses.
Next, we dragged the same draw path to cover the bottom portion of the sunglasses, making it large enough to fill the gaps between the face and sunglasses. For the middle portion of the sunglasses, we added a new path. Again, we adjusted the size of the path to avoid revealing unwanted portions.
And voila! We’ve completed the draw path for both images. Take a look at our hand-drawn preview – no more scribbles!
Now it’s your turn! Import your own images and apply draw paths. But first, let’s go over some important drawing tips:
– Make sure to use the right path size for a great drawing.
– When working with colored images, be precise to avoid revealing unintended portions of the image.
– Use either one path or multiple paths for a more precise drawing stroke.
– If you’re struggling to add a draw path, try zooming in for better visibility.
– When dealing with edges or angles, use tiny dots of draw path and extend them as needed.
– With black and white images, you can use the same draw path to cover different portions.
– Remember, the goal is to create the illusion of drawing your image one color at a time, so focus on areas with the same color and use one draw path to create your drawing.
Don’t worry if your draw paths aren’t perfect at first. Precision takes time, especially with complex images. Start with simpler images to practice and improve your skills. Let’s dive in and have fun with draw paths!


