Free
Mastering the Camera Feature in Toonly
Did you know that Toonly has a hidden gem that can transform the way you create animations? The camera feature in Toonly is more than just a visual enhancement – it’s a game-changer for storytelling. With the camera tool, you can zoom in and out, pan across scenes, and add depth and dynamism to your videos. If you’ve been curious about this powerful tool, we’ve got you covered. In this comprehensive guide, we’ll walk you through everything you need to know about Toonly’s camera feature. From understanding keyframes to mastering camera movements, get ready to take your animation skills to new heights.
Unleash Your Creativity with Toonly’s Camera Tool
Toonly’s camera tool is the key to unlocking a whole new level of flexibility and depth in your videos. It allows you to make dynamic changes to your scene’s perspective, creating engaging and visually captivating videos. Whether you want to zoom in on details, pan across a scene, or combine both movements, the camera tool has got you covered.
How Does the Camera Tool Work?
To activate the camera overlay, simply access the timeline and click on the camera option. The overlay acts as a viewfinder, letting you see your scene through the camera’s lens. When the overlay is activated, it takes on a distinct blue hue, making it easy to switch between the camera’s perspective and the overall scene.
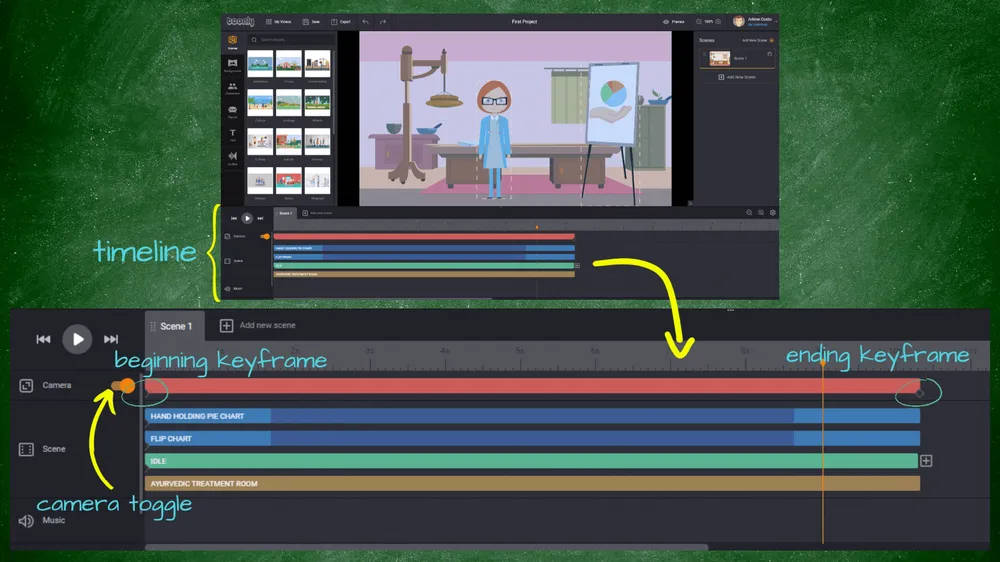
By default, the camera tool starts in a fully zoomed-out position, showing the entire scene. However, to make your videos more engaging, you’ll want to adjust the camera’s view. This is where keyframes come into play.
The Magic of Keyframes
Keyframes are markers that allow you to control the camera’s movements over time. Every scene has a beginning and ending keyframe by default. The beginning keyframe represents the initial camera position and zoom level, while the ending keyframe defines the final position and zoom level. By manipulating these keyframes, you can create captivating camera movements that bring your scenes to life.
Here’s How It Works
To set your camera’s movement, start by deciding what the initial scene should look like. Set the starting keyframe to have a wide view of the entire scene. To adjust the view, simply click on the keyframe and use the camera overlay controls.
Next, determine how you want your scene to end. Click on the ending keyframe and adjust the camera view to your desired position and zoom level. For example, you can zoom in on a specific object or character to create a captivating ending.
Once your keyframes are set, Toonly automatically animates the camera movement between them. You can preview the animation using the preview button to ensure it matches your creative vision.
Get Ready to Transform Your Animations
With Toonly’s camera feature, you have the power to add depth and dynamism to your videos. By mastering keyframes and camera movements, you’ll be able to create animations that captivate and engage your audience. So, what are you waiting for? Start exploring the possibilities of Toonly’s camera tool and elevate your animation skills to new heights.
Creating Dynamic Scenes with Keyframes
Do you want to take your animations to the next level? Adding keyframes is the way to go! Keyframes allow you to create dynamic scenes with captivating camera movements. Whether you want to zoom in on a character, pan across a scene, or follow a character’s movement, keyframes give you the power to do it all.
Here’s how to add keyframes for dynamic scene transitions:
Open your animation project.
In the timeline, choose the starting point for the camera movement.
Double-click on that point in the timeline to add a new keyframe.
For a static camera effect, you’ll need two keyframes. The first marks where the static camera starts, and the second marks where the movement begins. Keep both keyframes set to full screen to maintain a consistent view.
To introduce camera movement after a static period, adjust the camera’s view on the next keyframe.
Drag the keyframes closer or further apart to control the duration and speed of the camera movement.
Preview your animation and make sure to save your changes.
But wait, there’s more! Here are some additional tips to help you master keyframes for dynamic scene transitions:
Use multiple keyframes for complex camera movements. Zoom in on a character, pan across the scene, and let your creativity run wild!
With keyframes, you can create camera movements that go beyond the default controls. Follow a character as they navigate through the scene and bring your story to life.
Don’t be afraid to experiment! Play around with different keyframe settings to achieve the camera movements you desire. There’s no right or wrong way, so have fun and see what you can create!
Deleting Unwanted Keyframes Made Easy
Sometimes, you realize that a camera movement doesn’t fit your animation as you had hoped. Luckily, Toonly makes it effortless to remove unwanted keyframes and their associated effects.
To delete a keyframe, follow these simple steps:
- Select the keyframe you want to remove. It will be highlighted or marked.
- Press and hold the ‘option’ key (or ‘alt’ key) on your computer.
- While holding the ‘option’/’alt’ key, click on the selected keyframe. Poof! The keyframe is instantly gone from your timeline.
Keep in mind that deleting a keyframe also removes the specific camera view and movement linked to it. The camera movement from the preceding keyframe will continue until it reaches the next existing keyframe on the timeline.
The ability to delete keyframes gives you the freedom to experiment and try different camera views and movements. If an effect doesn’t meet your expectations, you can easily remove it and explore alternative options. With Toonly, you have the flexibility to achieve the exact results you want.
Unleash Your Creativity with Multiple Camera Movements
Toonly’s dynamic camera tool goes beyond individual movements in a scene. It empowers you to craft multiple, distinct movements within a single scene, allowing for even greater flexibility and creativity in your animations.
To create multiple movements in a scene, follow these straightforward steps:
Start with a wide view of your scene, with characters or objects placed in different locations.
Choose the first character or object you want to focus on. Let’s call this your first focal point. Double-click on the timeline to create a new keyframe at the desired zoom-in point.
Select the new keyframe and adjust the camera view to highlight your first focal point.
Decide where the camera should move next. This could be another character or object in the scene. Double-click on the timeline to create another keyframe for this movement.
With the new keyframe selected, adjust the camera view to focus on your next focal point. Repeat this process for all the movements you want in your scene.
If you want to end with a zoom-out to display the entire scene again, create a final keyframe at the end of the timeline and adjust the camera view accordingly.
Once you’ve set up all your movements, preview your animation to fine-tune the timing and positioning of your keyframes. Make sure the flow of movements matches your vision perfectly.
With these techniques, you’ll be able to create stunning animations with captivating camera movements. So, let your imagination take flight and bring your scenes to life like never before!
Introducing the Camera Magic of Toonly!
Ready to take your animated videos to the next level? With Toonly’s incredible camera tool, you can create movements that will captivate your audience and bring your animations to life. By adjusting the perspective with keyframes, you have the power to guide the viewer’s attention and tell a truly dynamic and engaging story.
But that’s not all – Toonly’s camera tool is incredibly versatile. You can add and delete keyframes, orchestrate elaborate movements, and refine every detail to perfect your storytelling. It’s a tool that empowers both beginners and experts to create stunning, immersive, and unforgettable animated masterpieces.
Sure, it may seem intimidating at first, but with practice and curiosity, you’ll soon find yourself effortlessly using Toonly’s features to unleash your creativity. So go ahead, dive in, let your imagination run wild, and use Toonly’s camera tool as your paintbrush for the world of animation.


