
Free
Adjusting Asset Settings
Improve your workflow and maximize your investments with these easy tips for adjusting asset settings. Don’t miss out on potential growth opportunities any longer! Whether you’re a seasoned pro or brand new to animation, Doodly makes it easy to create professional-looking video presentations. Our super easy-to-use assets are the secret to making your videos stand out and look polished.
But wait, have you taken the time to explore all the amazing features our assets have to offer? In this blog, we’ll take a closer look at the main assets – characters, texts, and props. You might be missing out on some fine features, so let’s dive in and discover them together.
First things first…
Where Can You Find the Assets?
If you’re already familiar with Doodly, you know where to find the assets. But if you’re new to Doodly, I’m excited to let you know that the assets are located within Doodly’s Edit Video page. Here’s how you can access them:
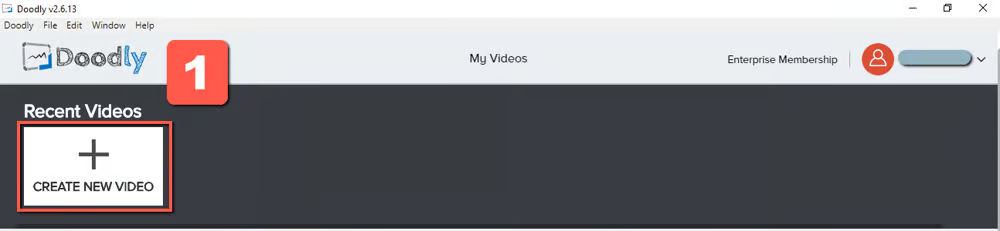
1. Log in to your Doodly account and you’ll see the My Videos screen. Click on Create New Video.
2. A pop-up screen will appear. Select a background style for your video, give it a title, and hit Create. Don’t worry about the resolution for now, you can always change it later.
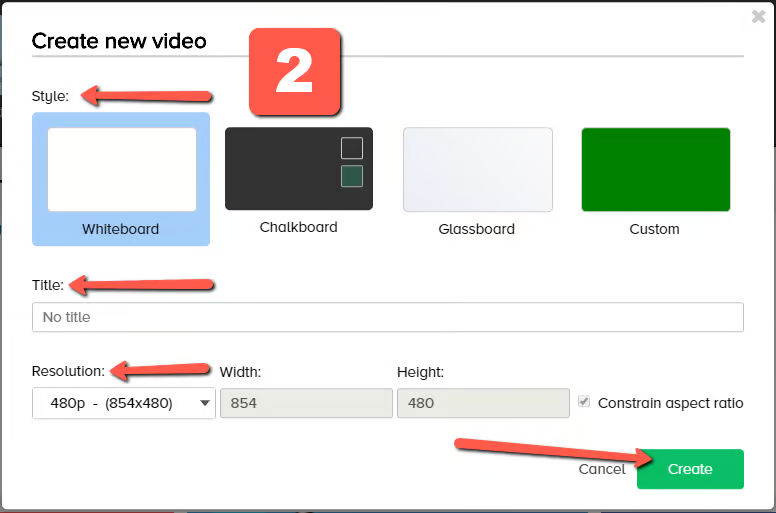
You can update your board style, title, and resolution anytime, so you’re not stuck with your initial choices. Just head over to Video Settings.
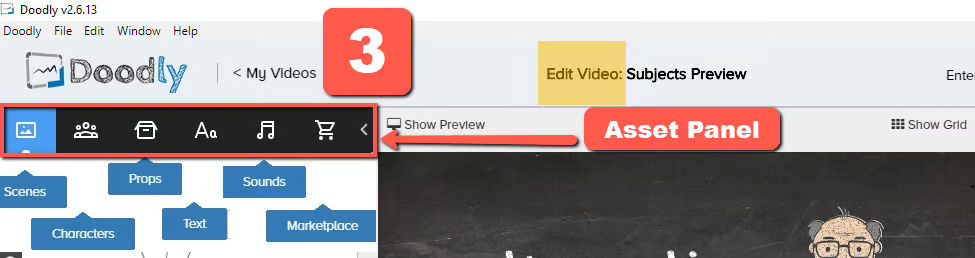
3. Once you’ve created your video, you’ll be taken to the Edit Video screen where you’ll find the Asset Panel.
Please note that the number of assets available may vary depending on your Doodly package.
Now let’s take a closer look at each asset, starting with scenes.
Overview
Scenes add preset backgrounds, settings, or locations to your videos. They’re perfect if you have a topic in mind but need some layout inspiration. For example, if your topic is about school, scenes offer various school-themed presets for you to choose from. And if you need to customize anything, you have the flexibility to do so.
Each object within scenes is movable. If you only want to use the background or remove certain props, it’s easy to make those adjustments.
Now let’s move on to characters.
Characters
Characters are cartoon-style people that come in a variety of options based on their profession, ethnicity, gender, emotions, gestures, and more. Let’s add some characters to the scene we chose earlier.
Sometimes, you may need to resize characters to ensure they’re in proportion with other props in your scenes. Keep in mind that some characters can’t be made super small. In that case, you’ll need to adjust the size of other props to maintain a balanced look.
In the image above, picture A shows the original size of the students after being added from the assets panel. We tried to make them smaller, but they couldn’t be reduced enough to make the bus look larger. It didn’t look right to see tall students walking outside the school next to a small bus, so we adjusted the size of the bus instead and made it bigger, as shown in picture B.
In addition to adjusting size, you can also position characters in the scene. Placing them in front of your board gives the illusion that they’re in front of the camera, making them stand out among other assets.
Lastly, let’s talk about props.
Props
Props are objects you can use in your presentations. If you can’t find a specific item you need, don’t worry! You can always upload your own props or characters. Just click the “+” sign in the asset panel, locate the object on your desktop, and hit Continue.
If you’re having trouble uploading an object, try dragging it to your downloads folder and uploading it from there.
When you click on a character, prop, or text, you’ll see a dashed line with menu options and a “rotate” icon. These are the tools we use to edit our assets. We’ll delve into each function in just a bit.
More Fonts, More Fun
Explore a vast selection of fonts in our Text tab. Want even more options? You can easily import your own stylish fonts! Discover free fonts online, like the ones available on fonts.google.com.
When it comes to customizing your text, our user-friendly edit menu has 4 icons to help you enhance its appearance: asset settings, bring forward, send backward, and delete.
Sounds Made Simple
Unlock an array of audio files and tracks in our Sounds tab. The best part? All of Doodly’s tracks are royalty-free, so you can use them without worrying about copyrights. Choose from music tracks or sound effects to add the perfect audio to your videos.
Just like with texts, props, and characters, you can also upload your own tracks or even record your own voice for a voice-over. The possibilities are endless!
Easily Add Assets
Adding assets to your canvas is a breeze. You have two options: simply drag and drop them onto the canvas or double-click on an item in the assets panel. Texts, on the other hand, can easily be dragged onto the canvas.
Resize and Move with Ease
With just a click, you can effortlessly resize your assets. Surrounding your selected object, you’ll see a dashed-line with 9 small squares. Hover over these squares and you’ll see a double-sided arrow—click and adjust your objects to make them smaller or bigger.
To reposition your asset, just look for the “cross” double-sided arrow that appears when you hover over it. Click and drag the asset to your desired location on the canvas.
Arrange, Remove, Repeat
Moving characters behind or in front of other assets is a breeze. Simply click the backward or forward icon to adjust their position. And if you need to delete an asset, just click on it and press the delete button on your keyboard.
If selecting an asset becomes challenging due to a crowded scene, don’t worry! Just head to the Layers menu, select the item you want to modify or delete, and the object will be highlighted for easy editing.
Customize with Asset Settings
Easily customize your assets with our convenient asset settings. After selecting an item in your scene, just click on the gear icon—the first menu that appears.
Once you click the gear icon, a pop-up window will appear. Let’s explore each feature.
Coordinates Made Easy
The X & Y coordinates reveal the exact location of your asset on the screen. Want to preserve the same location for your next scene or presentation? Simply copy the X & Y coordinates and you’re good to go!
Perfectly Sized Assets
Width and height are here to ensure your objects have a uniform size across all scenes. Keep track of these dimensions for consistent props throughout your videos.
Precise Positioning with Rotate
The rotate feature helps you achieve just the right placement for your assets. Use the rotate icon to adjust their position or take note of the rotate number for characters with a specific orientation, making it easy to replicate their positioning in other scenes.
Flipping Made Fun
Get creative with our flip function! Easily flip props and characters horizontally to change their orientation. Need your character to point in a different direction? Simply click the flip icon and watch the magic happen.
Colors That Pop
Add some flair to your assets by changing their outline color. Customize the default black outline to match your board’s custom color. Use the color palette to choose from preset colors, or enter the color’s hex code for the perfect shade.
Adjusting Visibility
The opacity feature allows you to control the visibility of your assets. From 100% visible to completely invisible, you have full control. This is especially handy when working with spooky assets like ghosts.
Discover the Power of Enter and Exit Animation
Tired of drawing each object in your presentations? With enter animation, you can make objects automatically appear on your screen without the need to draw them. This time-saving feature is perfect for scenes with a lot of props. And if your voice-over or audio track is short, it’s even more helpful. However, if you need to explain certain things, drawing each object can be a great idea.
You can easily modify the enter animation from the asset settings or the Layers menu. Simply update the duration time to zero for a quick and seamless appearance.
But the fun doesn’t end there! With exit animation, you can decide if you want to erase an asset after it appears on the screen. Say goodbye to unwanted elements with just a click of the eraser icon.
Sound the Right Notes with Enter and Exit Animation
Enjoy the freedom to use royalty-free tracks in Doodly, so there are no copyright worries. But if you prefer, you can also upload your own audio tracks. Set up sounds for both enter and exit animation to captivate your audience and emphasize key points in your presentation.
Unleash Your Creativity with Invert
Want to switch things up? The invert feature allows you to convert black outlines to white or vice versa. If you’re using Doodly rainbow, turning on “Invert” changes the color of your assets from dark to light or light to dark.
Even if you’re in the middle of video editing and suddenly decide to change your outline color, Doodly’s got you covered. Just turn on the Invert function and voila!
Add a Splash of Color with Doodly Rainbow
Bring your assets to life with Doodly Rainbow. Add vibrant colors to your presentations or go black and white for a classic touch. Don’t worry, turning on Doodly Rainbow won’t affect existing scenes with black and white assets. You can still mix colored assets in a black and white scene. And if you want to focus on your characters, create all black and white backgrounds and make your characters stand out in color.
We just covered the basics of asset settings, but there’s more to explore! The pencil icon on top of each character leads you to the Edit Asset settings, where you can fine-tune draw path settings. Check out our separate blog for all the juicy details.
Now that you’ve learned about these amazing features, it’s time to unleash your creativity in your video presentations too!
Until next time! 🙂


